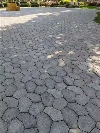

If you want to add a touch of beauty to your yard or garden, a paving stone walkway can be a perfect option. It is a simple DIY project that you can complete in just a weekend with the right tools and materials. In this article, we will guide you through the process of installing a paving stone walkway step by step.


1. Determine the size and location
Before you start, you need to determine the size and location of your walkway. Measure the area where you want to install your walkway and decide on the direction and pattern. Keep in mind that it is better to have a straight path if you want to save time and money.
2. Excavate the area
After you have determined the location of your walkway, you need to excavate the area. Dig down to a depth of about 6-8 inches, and remove all the grass and weeds. Level the ground and create a slight slope to allow water to drain away from your walkway.
3. Install the edge restraints
The next step is to install the edge restraints to prevent the paving stones from shifting. Use plastic or metal restraints, and stake them securely in place along the edges of your excavated area. Make sure the restraints are level and flush with the ground.
4. Lay down the base material
Now, it's time to lay down the base material. Use a crushed stone or gravel with a depth of about 3-4 inches, and spread it evenly over the excavated area. Use a tamper to compact the material and create a firm surface.
5. Add the sand layer
After the base material has been installed and compacted, add a layer of sand on top. Use a leveling rake to distribute the sand evenly over the base layer. The sand layer should be about 1 inch thick.
6. Lay the paving stones
Now, it's time to lay the paving stones. Start at one end of the walkway, and lay the stones in your desired pattern, leaving a gap of about 1/4 inch between them. Use a rubber mallet to tap the stones into place, and check that they are level.
7. Fill the gaps
Once the stones are laid, fill the gaps between them with sand. Use a broom to sweep the sand over the stones and into the gaps. Repeat this process until the gaps are completely filled.
8. Secure the walkway
Finally, secure the walkway by compacting the stones with a plate compactor. Make sure that all the stones are firmly in place, and there are no gaps left between them. You can also add some decorative features like plants, pebbles or mulch to enhance the overall look.
Dear customer, thank you for your support and trust in us. We have always been committed to providing customers with the highest quality products and services, and we also attach great importance to customer feedback and opinions.
We understand your concerns and confusion regarding the issue of product prices. Our prices are determined by market demand and supply conditions, and we have been striving to control costs, ensure product quality and cost-effectiveness.
We also highly value your cooperation. If you have any further needs or discount requests, please feel free to contact us at any time. We will do our best to provide you with better solutions and prices, and hope to achieve a win-win situation through cooperation. Thank you for your support and understanding. We look forward to closer cooperation with you.
In conclusion, installing a paving stone walkway is a relatively easy and straightforward DIY project that can add beauty and value to your property. With the right tools and materials, you can create a stunning pathway that will enhance the look of your yard or garden for years to come.